
As a kid I’d
buy a ‘Lucky Dip’ bag from the corner shop and score a bag of sherbet with a
licorice stick in it, some loose wrapped lollies, a balloon and a plastic junk
toy and best of all a temporary tattoo.
I’d dip the small printed piece of paper in water, place it on my arm
and slide away the paper backing leaving in place the thin plastic sheet with
printed image to look like an unconvincing tattoo of a robot or some
such. Mum hated this, she felt tatts were vulgar. This was in a time when they weren’t seen
much, well not on little girls in suburban Dublin. They washed off. Now I see tatts as body art on others and not
all are good but some tatts are immensely meaningful and talismanic and
stunning. I have none.
Why am I telling you this?
As a way
to explain about Laser Decals for ceramics. I’ve got printed work in the Burt Street Gallery, Cottesloe W.A. and my
students are asking how I make them.
Tune
out if you want, it's my blog, my words, my style. Share if you want, that’d be very nice, thank you.
Laser what?
Decal describes a decorative sticker applied to a surface such as wall decals, vinyl car decals and in my work - ceramic decals. Formula One cars? That’s not paint jobs, that’s adhesive decals. Think of your granny’s china cups with printed roses, think of promotional mugs or glasses touting Guinness, Bud Light, Starbucks. They started out plain then decals were applied and refired. Handpainting pots on a large scale is uncommon due to economy of time and scale. Machine or screen printed decals became the solution. Technology kicked in and artists pushed out.
Until fairly recently tertiary ceramics students in Western Australia and,
I’d imagine, other parts of my country, were taught all processes to create onglaze
decals. This involved preparing decal
paper, onglaze china paint/enamel ink with a medium, a silkscreen from their
own images, printing the image on the paper, sealing it with covercoat varnish,
and the solvent based clean up involved and finally to apply and fire the work.
Now industrial decal printers are accessible to do small runs to order as
do some superb smaller businesses with digitally printed onglaze decals such as https://www.facebook.com/cynthia.manietta.7 in Australia and http://www.foragestudios.com in Canada and http://www.milestonedecalart.com whom I believe are in the USA. It’s simple
to buy ‘open stock’ decals online too. Google is your friend. Baileys Decals in the UK or Bel Decal in the USA are two sources. When I require professional services to make decals I use Decal Specialists in Melbourne http://decalspecialists.com.au for my historical commissions in Western
Australia. I’m a ceramist who teaches
ceramics skills and Print on Clay techniques.

 |
| Applying a digital decal to a tile to to replace damaged ones in Joan Campbell's installation in at Bather's Beach, Fremantle, W.A. |
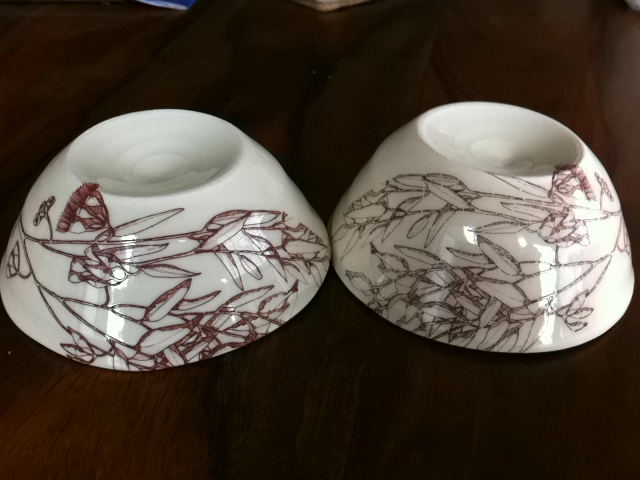 |
Drawings: Emma VinkovicCeramics: Elaine BradleyBowl on left had decal applied print side down on glazed vessel hence is a clearer print. |
 |
| Laser decals applied to unglazed porcelain, fired to ^10 |
I’ve come to be known for the use of IRON OXIDE LASER DECALS on my work –
very different to the colourful onglaze china paint type. Laser decal preparation is uncomplicated and
accessible. The use and firing temps
required differ to traditional decals. Laser decals fire to one colour only – shades of rusty sepia brown, but
ceramists the world over are finding ways to utilise this into in oxidation,
reduction, wood and soda firings. The sepia quality lends to a certain vintage look when desired. They work beautifully on and between glass too.
How did it all begin?
Anecdotally, a potter burning some photocopied pages on which there was black text observed the print remained intact but brown on the grey ashes of the sheets, concluding there was iron in the toner composition. This led to experiments with stopping photocopiers half way through their printing processes – where the text or image is printed in toner powder onto a page then halted from the following stage of being compressed via hot rollers in the machine. The powdery page is removed carefully and ideally a slab of clay would be laid down on top of the printed page to capture all that unfixed toner powder, then flipped over and the paper removed revealing the transferred print. Once the clay is formed by a potter into it’s final state – say a plate, then fired, the blackness burns out the in the kiln leaving instead the printed impression in a rusty brown colour – iron oxide – at bisque temp unfused. Word was out and potters all over the world were eying, accessing and possibly ruining photocopiers everwhere, to try this print on technique on their work. But that was a messy business and in my experience when people knew what you were experimenting with they denied you access to their printers – the rotters. Modern photocopiers and laser printers don’t let you halt them halfway through the process now. Pfft!
I learnt of this well over a decade ago via now defunct chat
rooms like http://www.potters.org/subject103166.htm Most potters are curious and generous with information. Then I learnt
more via Paul Scott (UK), one of the first contemporary artists to write on the
subject, when he came to Australian National University in Canberra.
 Ceramics lecturers in US grad schools back as far back as 2003 were
quick to experiment and share what they found with their students, who
continued spreading the process. This
led to printing on temporary tattoo paper aka ‘laser decal paper’ – a stiff
paper with a substrate of water soluble gum and fine layer of plastic on
it. Print on this with a laser printer
which has iron oxide in its toner (this is the KEY and HP laser printers
usually have it), trim the image, waterslide it into position, squeegee the air and water out
from behind it, dry and fire.
Ceramics lecturers in US grad schools back as far back as 2003 were
quick to experiment and share what they found with their students, who
continued spreading the process. This
led to printing on temporary tattoo paper aka ‘laser decal paper’ – a stiff
paper with a substrate of water soluble gum and fine layer of plastic on
it. Print on this with a laser printer
which has iron oxide in its toner (this is the KEY and HP laser printers
usually have it), trim the image, waterslide it into position, squeegee the air and water out
from behind it, dry and fire.
Unlike other types, tonal images work brilliantly
with laser decals and again unlike with normal on-glaze decals - overlapping the imagery without losing any of the print
is possible.
Later in my ceramics studies Professor Suzanne Wolfe of Univ. Hawaii
visited ANU and laser decals were a topic.
We worked out that watersliding the image onto a glazed surface was easy
and fired well but applying the decal upside down to the surface gained a
crisper print. See image for comparison above.


So here are my top tips:
- Try to use your own imagery, text or photos - be aware of copyright issues.
- Remove separating sheets if any.
- Print ONTO the shiny side of the decal paper, this is a very fine layer of plasticy film, and the print is laid down on that in black.
- Feed one laser decal sheet at a time into printer.
- Trim around the image/text, with a margin of about 5mm.
- Place it in a bowl of water, it curls up, then uncurls as the water seeps into the white backing paper. The thin layer of gum between the white sheet and the shiny layer begins to release the plasticy layer.
- Lay this on your glazed surface, and slide the shiny part off the paper and onto the shiny glazed surface that’s - what they mean by 'waterslide'. Hold the decal in place with one finger while the other hand slides the backing paper slowly from under it. Pat and squeegee from the centre outwards to remove any water or air bubbles.
- Dry well before firing.
- If applying to a glazed surface - fire to between Cone 04 and 03, you are guessing the melting point of the glaze for which the print to fuse to the surface.
- If applying to bare unglazed clay – I work on smooth porcelain, fire to Cone 9 for the oxide to truly fuse to the clay surface.
- If you can apply the decal face down to the work you'll get a better print than face up. Mirroring and flipping images may be required.
- Vent the kiln, leave the lid or door ajar as the plastic substrate burns out, its probably toxic. Stay away till the firing is done. Ensure the kiln area is well ventilated and has an extractor hood switched on.
- Test your decal - once out of the kiln, wipe across an edge of the image with a wet fingertip - if it blurs, the image hasn't fused to the glaze - refire 10 degrees hotter.
- If you are combining print techniques on a piece with multiple firings- remember to do the laser decals first, then the on glaze later at the lower temperature they require
 |
| Testing a print to see if it has fused to the surface. |
Resources:
In Australia Clear laser decal paper is sold in from Decal Specialist, Melbourne in A4 format
In Western Australia The Potters Market in O’Connor carries it - usually US Letter format.
In USA Bel Decal USA sell it in US Letter form but only in large quantities. You need Code L8100C Clear Laser Decal Waterslide Paper
I can sell individual sheets on request potterlalab@gmail.com
I can print individual sheets of your designs potterlalab@gmail.com
Etsy.com has sellers offering laser decal printing services
Some potters who use laser decals well in their work follow. Show me your work and links and I might edit this later to include you on the list.
Elaine Bradley Ceramic Artist
Sit back and relax while you enjoy the sunny and wonderful potter Marian Williams video on iron oxide laser decals
You can access the generosity of potters using decals through sharing their knowledge in these great articles
I've wasted so much time trying to get the text here looking uniform. I'm going to stop trying.
Was that post informative? I'm looking forward to your comments.
So very well written. Thank you Elaine
ReplyDeleteThank you so much for all this information. You are wonderful.
ReplyDeleteCan you etch/engrave any design? Can you print from vector files?
ReplyDeleteYou print anything onto laser decal paper that your computer can send to your printer. It is a print technique transferring a printed image - nothing to do with etching or engraving.
DeleteThanks for this! I have a question. I fired colored commercial decals onto a glazed porcelain pot at 016. They look good but I want to add more of the same. Can I do that without ruining the first batch of decals already on the pot? Tova
ReplyDeleteSorry for only seeing this now. I’d expect the first set of decals to be unaffected by the second firing as long as you don’t overfired.
DeleteSo informative thank you so much. Do you keep the kiln lid cracked open the whole time? Thank you so much.
DeleteGoodness! People are still reading this lol.
DeleteI leave the vents open until 200C
Thank you for you fabulous insight into making decals….I am on my journey to making my own when I manage to find the right copier!
ReplyDeleteNot a copier, a printer. Hewlett-Packard laser printers are your best bet. It isn’t hard to find your brand, model number and navigate to the contents of their consumables to work out if there’s iron in some form in the ‘ink’
Delete